CLICK HERE FOR FREE BLOGGER TEMPLATES, LINK BUTTONS AND MORE! »
Showing posts with label Rule Release 9. Show all posts

Monday, January 2, 2012

9 and 10 done - The Quilted Barn

I am finding some time to catch up -- yippee!  I am only three behind now.

The first row was added to the bottom of the quilt.  Different sized blocks that fit together are in the barn section while the orange flowers are 3D.

The very bottom row has the folded insert technique.  I did it very simple by folding the green strip of fabric on the bottom right and catching the edges in the seam.  I appliqued the fold down.  The disappearing 9 patch is in the front of the lower red barn.  I sewed the disappearing pieces together at random with no specific rhyme or reason.

Now I am off to making a bridge and horse/buggy to begin my column.

Oh, I finally got all of my itty bitty flowers attached to the fence between the two big trees.  They are a bit busy, but I like it.

I also added three small trees below the "falling apart" old barn on the left.
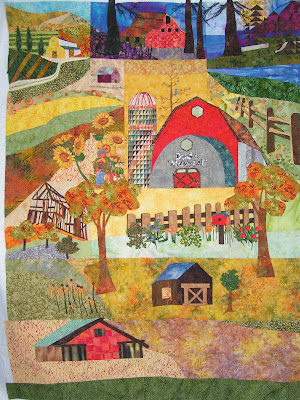
Below is a close up of the two newest rows.

Below are closeups of the flowers.  The whole flower section was made by putting fusible webbing on the back side of the fabric, fusing it to itself, and then cutting out the flowers.  The front and back of the flowers are the same fabric.  Most were attached with a French knot, but some I used invisible thread.

Tuesday, November 1, 2011

Marie's Optical Illusion Rule #9

I finally have finished Rule 9.  I'm still way behind, but at least I'm making some progress.  This rule called for different sized blocks that fit together.  I used this rule to make my star.  The technique was something 3D that actually sticks up on the quilt.  My pinwheels in the center of the stars are 3D.  To make the rule fit my theme of optical illusions, I added a shadow to the star.  I wish I would have made the shadow a little darker, but I'm not going to do it over!


Here is the quilt with the Rule 9 blocks added.


I hope to get Rule 10 completed before Rule 13 comes out in a week, and then hopefully I'll get the rest caught up before the end of the year. 

Wednesday, October 12, 2011

Country Holiday Traditions


I can say one thing about this Mystery quilt....it truly is just that, a mystery that unfolds and leads down different paths with each new rule and technique. I have been playing catch up, but I can tell you that this project hasn't turned out like anything I had envisioned in the beginning.

Here are my rules #9 and #10. Number 9 was to add something 3D, if you look close the wings on my chickens are 3D. Number 10 is a disappearing nine patch and a folded insert. My sunflower garden is the nine patch and the leaves are my folded inserts. The leaves are beginning of my fall holiday traditions.

I knew at the start of the quilt, I wanted to have the holiday traditions surrounding a home, but I didn't anticipate all that I've added around the home. This project has really stretched me. I'm loving all I'm learning. It is a simple, but the disappearing nine patch was fun to do. I like the possibilities that can be done with it.

Friday, October 7, 2011

Lyn's Small Town Winter

I am posting this for her as she doesn't do blogger.  Lyn has completed and added rules 8, 9 & 10. 

Rule 8 is the block with the yellow house, brown tree, and rock piller fence posts placed in the lower right.

Rule 9 features more of the lake, the mountain behind it, pine trees, and embroidery work so show more backgrouond hills.  For the 3-D portion of the rule she added black colored birds flying above the pine tree on the right.

On rule 10 she tried to do the disappearing 9 patch in the sky and then changed it because it looked too boxy for clouds and sky.  She did the folded inserts on her clouds.  They are difficult to tell that they are folded inserts because she did such a fine job of stitching down the fold, but they are the long skinny clouds.  Don't they look great and oh so clever?

Friday, September 23, 2011

Rule 9 finished!

Finally got to quilt and do something for me.....probably should have been doing homework, but decided to play "hooky" for a few hrs and get rule 9 completed and added to my quilt top. Made three 3D pinwheels and used buttons to embellish the blocks.

Now the only problem is, that the quilt top is about the size I typically give as baby quilts, and that is what I had planned to do with this quilt at some point. But I know that there are still more steps coming.....not to mention the two that I'm behind on at this point. I'm thinking I'd like to stop adding to this one at this point, with the exception of a border. But then take the remaining steps and start working on with them to make another quilt. I hope that's ok with everyone!

Meanwhile here are a couple of pics of the panel that I added, and the quilt top as it is now. =)


Wednesday, September 14, 2011

Scarecrow , rule 9


For rule 9 I put together 2" and 4" blocks.  The 4" blocks have little scarecrows from the wizard of oz in the fabric.  For the 3D technique I made sunflowers.  Two of them are yoyo's .  Two of them are made with the new Kanzashi flower makers from Clover.  One is a folded yoyo technique that I followed a tutorial on a blog. Each flower is attached to the block with a button.   The scarecrows are simply a piece of printed fabric that I cut to fit  the remainder of this row.  

Here it is sewn to the first 8 sections.  All sandwiched and quilted up to this point!


Friday, September 9, 2011

Rule 9 - Granny Annie's Garden


Finally finished Rule 9. Not doing a quilt so made a "banner" for over my living room picture window. It measures 96 x 12 inches (no wonder it took me so long). Too wide to get a picture of the whole thing so here is the right & left sides plus a closeup of one of the blocks. The center block is the multi sized blocks - there are 2, 3, 4 & 6 inchers put together to equal the 12 inch.

Wednesday, September 7, 2011

Finally, Steph's rule number 9!

I guess I should give you a quick personal update first...

This summer was loads of crazy crazy moving around and fun and LOADS of frustration, and obviously, I was WAY too busy to do my quilting, plus, I did not have electricity anyway.  Then, I moved in to my new dorm.  Wow, college is crazy!  And... I didn't bring up my sewing machine at first, and then I worked all Labor day to get stuff done, and only finished one block.

Also, I am using some of my mom's scraps... meaning, it would be a challenge to fit bins of scraps in my little apartment... so I don't get to do anymore until fall break.  But it's okay, because I wanted a lap-size quilt, and when I get to do #10, it will make it the size I want it.  So I will be done then anyway, unless I REALLY want to try the #11 rule... hehe, that might be a temptation.  Anyhow, here is my block!

It is my, VERY artistic rendition of my most favorite view in the world.  (From the camp I work at over the summers)
So, here is a close up on the water...
I made the reflection as part of the block, and then I applique'd on some blue organza, and tacked it down with the ripples.  I am rather pleased with the effect.

And those bow-tie blocks?  Those are 3-D.  I am not a huge fan of things sticking out of my quilt, so I did some research and found this pattern, and it is SO much easier than a regular bow-tie block!

Well, there you are!  I am getting closer to being caught up!

Sunday, August 21, 2011

Rule 9 completed (finally)

This is my completed rule 9. I think I got the rule right about the squares.


This is a close up of the 3-D flying geese technique and the rule. I used Ricky Timms' one seem flying geese for the technique.


This is what I have so far. I still need to do Rule 10. I am a little behind. It is getting harder to take a picture. Our project is getting quite large. I like the way it looks on my bed so far. I need to get a design wall so I can have a way to take large pictures.


Everyone is doing such a great job. I am sorry that I can't make comments. I am still having trouble leaving comments. It is so exciting to see all the creativity.

Pam in Texas


Monday, August 1, 2011

Dorine's Rule #9


Hurray!! It's reveal day! As you probably all guessed, my theme for Rule 9 is chickens. I actually did a rooster, a hen, eggs, and baby chicks. Here is the complete block, but it had to be so small to fit it all in, that I did pictures of the individual sections as well.

Here is the hen. I put the ruler in so you could see the 3D parts. The legs are machine embroidered, and the body is needle turn applique. The comb is simply fabric folder over and gathered. I sewed it on first then appliqued the head over it.

I did the rooster in basically the same way except the tail feathers instead of a wing are 3D. The 3D parts are all self lined, and the under side of each is machine stitched to the background fabric so no raw edges are exposed.
This is my section where two smaller blocks are joined to the larger blocks. No 3D in this section.
And here is the whole quilt put together. I had great fun with this block. I'm really glad I chose this theme. It has been really fun finding ways to use it with the different rules and techniques.


Rule 9 Complete

Here we go with Rule #9
The windmill is my 3-D portion. The teaser shows it better than the whole block, because it is zoomed in better. The top of the windmill is a separate, small block, and the base is a larger block, so they fit together by adding to the sides of the top block.
This was really fun, and a challenge for me, as I have never done this type of 3-D before. I knew what I wanted to do, but doing it was harder than I thought it would be. I think the circle was what made it more difficult.
This is not what I had in mind when I started the block, but it took a life of it's own, and I like how it turned out.
As you look at the blocks all together, you can see that I added more to this rule when I put it together with the rest of the blocks. The pond just did not look right, so I added some rocks along the top, and took away the stark line.
If you can't zoom in enough to read it, the hexie has embroidered around it "Daughters of Dorinda Mystery 2011 The colors of Autumn in the Country.
I changed search engines and I think you can put comments in now.
Also, this weekend we are doing our "Sisters Get Together". Marie, Dorine, and I are getting together (and bringing our husbands too) and I am so excited. We try to do this every couple of years, and it is so much fun! We always try to do something we have not done before, and we intend to just see the beauties of Utah this time.

Friday, July 8, 2011

RULE RELEASE 9

It's time for our Rule Release 9, so here we go:


RULE:  Use different sized blocks that fit together. For instance, use a 4" finished block and 2" finished blocks as their measurements fit together easily.

TECHNIQUE:  Something 3D - it actually has to stick up on the quilt like flower petals or embellishments.  (This won't be a flat 3D like we did before.)

SIZE:  At this point our quilt should measure 37-1/2" tall and  43-1/2" wide.  Block # 9 will go on the top or the bottom of the quilt.  This block will be the width of the quilt and 12 inches tall finished, so the unfinished block will be 43-1/2" wide and 12-1/2" tall.


When the block is finished post a picture of the block, then sew it to the top or bottom of your quilt and post a picture of the whole quilt.


DUE DATE:  We will have one month to complete this block.  You may begin posting teasers July 18, and the full release can be posted August 1st.  The next rule will be released August 8. 


Here are a few ideas of what can be done with 3-D:


http://0.tqn.com/d/quilting/1/0/R/c/-/-/3d-pinwheels.jpg


http://www.with-heart-and-hands.com/2008/06/3d-cupcake-quilt.html


http://ny-image0.etsy.com/il_fullxfull.200468000.jpg


https://blogger.googleusercontent.com/img/b/R29vZ2xl/AVvXsEhMZ1-FnS-yQwWgaP8CqzzJae11x8vyFmhuGZAixnE0V-Tk85A588-x57dEkSCfz_dIgb2pQxF4zuSi_X5y_e73COj6bHANXNNXoTwQoDrUvY4RYsNMDjtroLK-ILI7zMQHhXumufi0w8E/s400/a+funky+3D+chicken.jpg


http://3dfoldedblocks.com/


http://www.compuquilt.com/blockimg/1999Blocks/DimPinwheel.htm


HAVE FUN!!