CLICK HERE FOR FREE BLOGGER TEMPLATES, LINK BUTTONS AND MORE! »

Saturday, May 21, 2011

Barn teasers #6 & #7

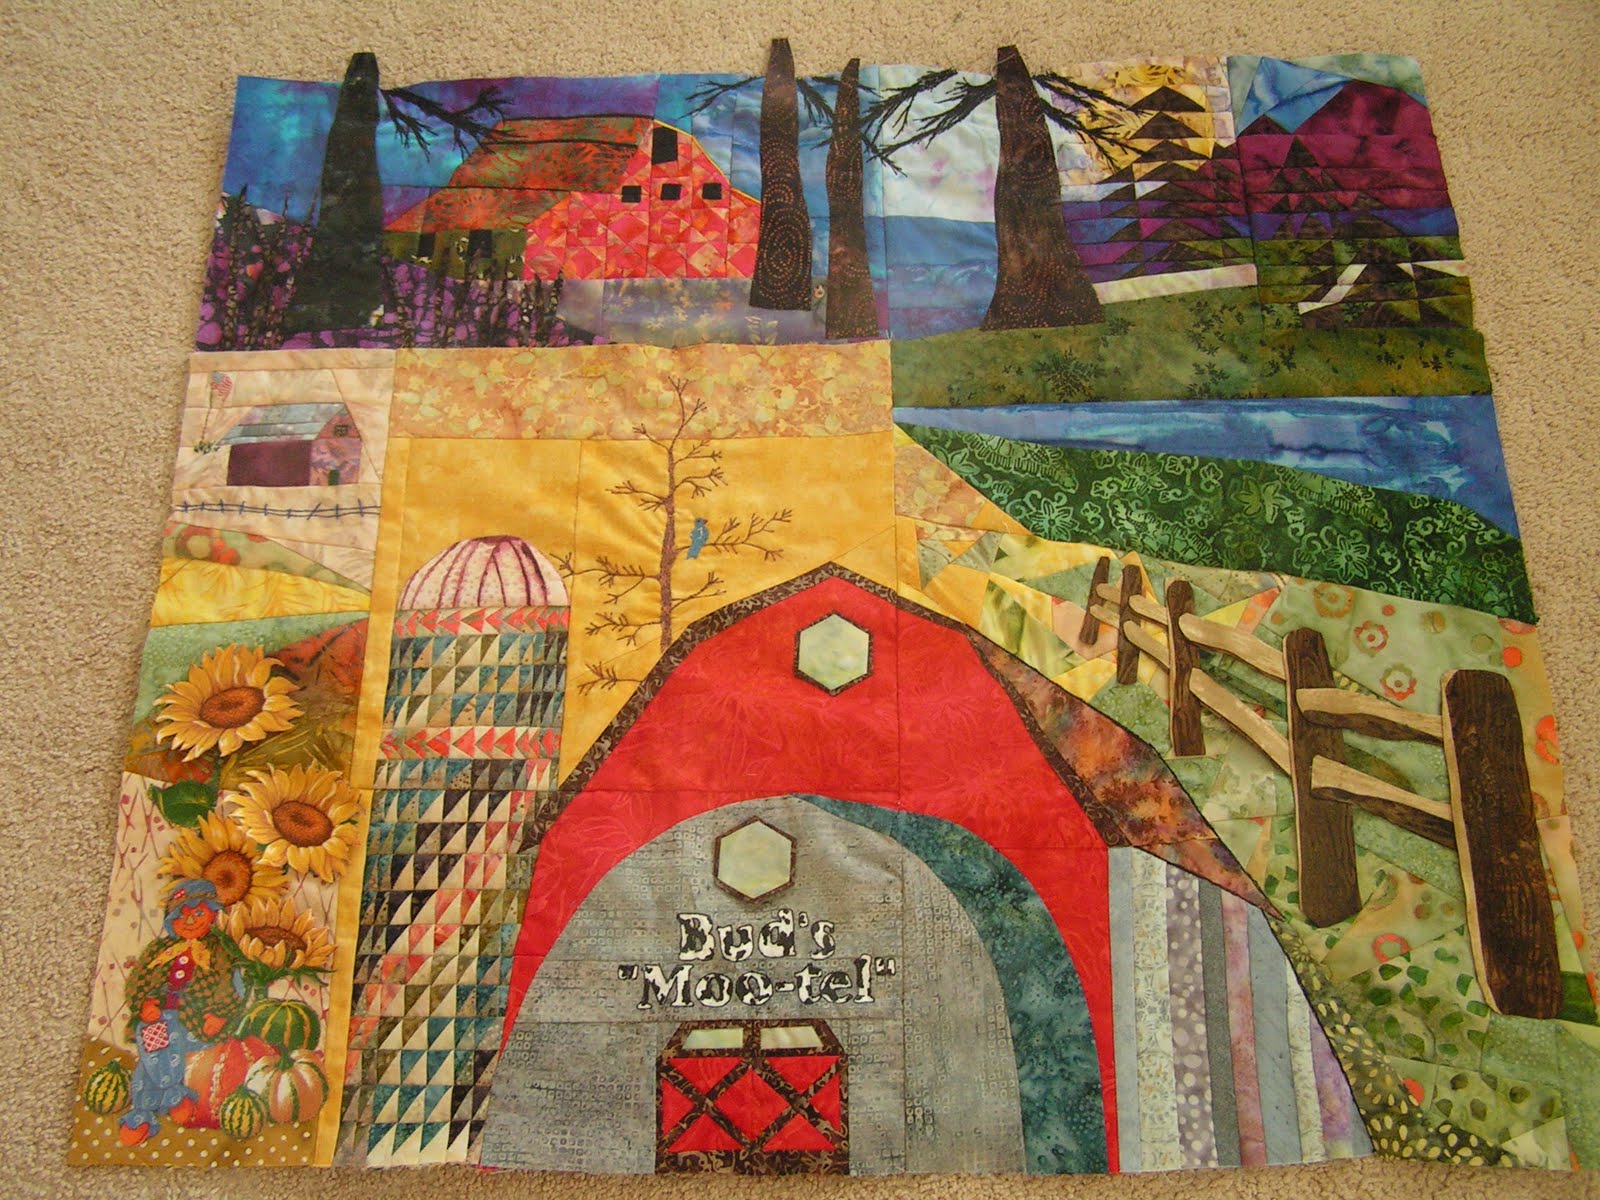
My #6 is pretty behind but slowly catching up.  It is a ton of work and I'm loving it.  Here is a sneak preview of it all layed out but nothing is stitched down.
Below is my teaser for rule #7.  You can see where it fits next to on the original quilt.

Thursday, May 19, 2011

Moira's Rule 7 Teaser

Finally got to work on my rule 7....and like normal for my work it ended up telling me what it wanted....lol. Got it finished and am posting my teaser for everyone to see. =)

Monday, May 16, 2011

Marie's Optical Illusion Teaser for Rule 7

  Here is my teaser.  It doesn't look like much yet, does it. 

Teaser #2 Rule 7, Autumn Country

Here is the second teaser (3-D)
My sewing time has been cut short for a couple of weeks. I have the new baby and her brother here during the week days and that is added to the 2 that live here. Three toddlers, a newborn, and sewing don't work together very well. That will all change soon, though. Mid-June our oldest granddaughter will be here to tend the little ones and the other two are moving in a couple of weeks. It will be VERY quiet around here.

Monday, May 9, 2011

Autumn Country Rule 7 Teaser

Here is the beginning!

Teaser, Birds Rule 7

Here's my teaser. Interesting, huh? Can't wait to post the whole thing!!

Wednesday, May 4, 2011

Lyn's Block


Lyn made a road to represent the curve piecing. She made a house for the building.

Monday, May 2, 2011

3-d Ideas

I've been looking at a lot of 3-d ideas since I started my Optical Illusions mystery quilt, so I'll give you a few links to look at to get some ideas.

Attic windows is a 3-d pattern:
 http://quilting.about.com/od/quiltpatternsprojects/ss/attic_windows.htm

Here is a tumbling block tutorial:
http://www.ehow.com/how_4926260_make-tumbling-blocks-quilt.html


Another idea is on this site.  Look at the 5th quilt down, entitled "3D Squares" by Moran Arft and Quilts:
http://www.kathykwylie.com/blog/2010/06/more-squares-and-rectangles-in-quilts/

Or how about this "tesselated" pattern.  It's the 4th picture down in pink and green
http://rhinoquilting.com/tessellation-quilts/whats-a-tessalation-quilt/

Here is another tumbling block (a little more complicated than the first one)
http://theunemployedquilter.blogspot.com/

Check out this "Op Art" quilt:
http://www.dohenybooks.com/product.asp?specific=136

Look at the cool 3-d quilt on this site
http://www.chbernhard.ch/quilts/ausstellung_turgi.htm

I hope this will give you some ideas and help you get started.  Good luck and have fun!

Rule Release #7

SIZE:   Our quilts should now measure 37 1/2" tall by 31 1/2" wide.  The next couple of rule releases combined together will now build a column to either SIDE of the project.  This portion of the column will measure 12" wide finished  (make it 12 1/2") and 17" tall finished (17 1/2" now).  It WILL NOT BE attached to the quilt at this time because we will join it to the other column pieces in the rules that will follow.

RULE:  "make something flat that looks 3D (example: tumbling block)"


TECHNIQUE:  There is none specified for this month.  Do what you want.

DUE DATES: 
  -Lets try a teaser release once a week now -- every Monday.  If you are gradually working on your project, you can show us the progress.  If you finish early, you can give us another sneak peak of a part of your block #7.  We would love for ALL to post something to keep us interested.
  -A completed photo can be released beginning on (Monday) May 23rd.
  -Final due date and rule #8 release date (Wed) June 1.

Saturday, April 30, 2011

Desertsky Susan - Rule 5

Or at least, I think it's 5.  I have taken a part-time job, and I'm losing track of everything as I try to catch my balance.  Here's the block on it's own:


Here's the circle and the freehand stitching, both abominable:


Here's all five steps, as far as I've completed each one. There is still work to do on the CQ block and the block on the bottom with the flowers.


I may turn rule 5 so the dark is to the outside, depends on what comes next on that side.

Friday, April 29, 2011

Moira's Rule 6


Finally had the time to work on and complete my version of rule 6. My house is a dollhouse and I also added a doll to my piece. I made a free form blocks using up the leftover strip set from the checkerboard. Added purple gingham strips as the curved pieces and like how it turned out.

Betty's scarecrow 6

I hesitated to start because of the pieced curves.   So I decided to try to keep it simple.   I used WOF strips and although my curves were gentle the whole thing came out kind of warped.  Lack of better description.  So did I start over?  No.  I didn't want to waste fabric.  I cut the pieced strip into chunks and sewed them back together.
You can't tell can you?   I should have kept quiet!   lol.  After my struggle with the green and brown I was too chicken to continue it into the sky.  My sky is one blue piece.  When I regained my thoughts after all that....
weeks later... I began putting machine embroidery designs onto it.  First was the little 'house' on the left.  Now we have a spring setting with the birds building in the birdhouses and kids planting the garden.  The scarecrows are helping with that.

I sewed 6 to the rest of it.  I have been doing quilt as you go.   So I  am showing a picture of the back.  The first four sections are sewn together,  since they were smaller.  I added #5 with the red/black flannel and #6 is added with the blue/tan flannel.  I am doing it similar to the Kate Woods six hour quilt method.  That way I don't need sashing or strips of fabric to join my blocks.

I was tickled to put the Outhouse in #6.  How often do you get the opportunity to put one of those in a quilt?
LOL.  (Or even want to!)

Thread Painting

If any of you are members of "The Quilt Show", they are doing a weekly lesson on thread painting.

Marie's Optical Illusion Rule 6

I'm pleased that I got this finished before the new rule came out.  This was a fun block to do.  I've never tried free motion curved lines before and it was fun to do.  It just doesn't make sense to me that they would fit together, but they do fit perfectly. 

I made a couple of mistakes.  The worst was that I didn't allow enough fabric for seam allowances so I ended up having to do curved lines on my black border to compensate, but when I finished I was glad that I made this mistake because I like the way it turned out.  I learned a few things and if I were to do it again I would change it a little.   I think I should have added a couple of trees, but I'm not going to take it apart.

I was afraid that all those curves would not blend in with all the straight lines in the rest of the quilt, but I think it will work out as I add more to the quilt.


Wednesday, April 27, 2011

Hello Bizzy Bee

Hello Bizzy Bee, Welcome to our mystery group!!  Please check your emails for an invitation to the blog and a special email from me.

Tuesday, April 26, 2011

Barns: teaser #6

While I was behind on rule 5 (by a long way) I do know what I'm doing for rule 6.  The design process is what takes me so long, so hopefully this one will be ready on time.

I think it is obvious what I'm creating here.

Barns Rule 5


Here is proof that I pieced the circle.  The top part of my moon was pieced this way while the rest was part of the paper piecing.
Here is the whole section.  My circle doesn't look perfectly circular because I placed the silhouette of a tree off center in it.  I do like it though.  I added thread painting in two places including the tree branches (also added to rule 4), and some outlining on the barn.  Originally I had a yellow background behind the barn which I loved, but I felt it needed a little more of something so I changed to a grassy green pasture look.  There are a couple of trees pieced in front of the mountains (they blend in a little) and an unexpected little river runs below them.  It is actually sky fabric but turned out more rivery.  I think I like it.

Here are some close-ups of the thread painted branches.  I'm no perfectly satisfied with them and may still work on them some.


This tree maybe needs a few more branches.  I also added one more badly needed black line on the barn roof.  It looks better now.

Saturday, April 23, 2011

Rule 6 - Granny Annie's Garden


Well I've decided to make Rule 1-5 into a wall quilt instead of continuing with a bed size quilt. But I will continue to do each rule and technique - the only difference will be the size. So here is my Rule 6 with a wonky house & a curved pieced lawn. This is the first time I've done a curved piece & I'm glad I did - have always wanted to. So this will be a mini:

Friday, April 22, 2011

Late Rule 6 Teaser


Am finally almost through with this semester in Grad School and I'm able to start sewing again! I've know for a couple of weeks what i wanted to do for this rule, just hadn't been able to post a teaser.....so here it is........... =) I'm hoping to get this block made this weekend...and will start it today.....


Tuesday, April 19, 2011

Late...Rule #5


I wanted to create a starry winter night with Santa, so the moon is my circle obviously. Then I machine embroideried a santa with his sleigh flying through the night. The words say, "He's making a list and checking it twice." I used a tutorial youtube from hgtv to make my circle. I found it to be simple and turned out nice. In the future, I will be more likely to play with cirlces now that it's not as challenging as I anticipated.

Here is all the rules so far together and my interpretation of winter country traditions. Now on to another season.

Saturday, April 16, 2011

Bird Block #6

Here is my block 6. As you can see, I did free motion piecing for the entire background. I love that technique. My house is pretty small as it is far in the background, but I got it in. I appliqued the swans with the needle turn technique I used on the fourth block. I could see the background behind the swan, so I took out some of the stitches and put in some batting. I like the puffed up look, so it was serendipitous. I machine embroidered the details.


Here is the block added to the rest of the quilt. Can't wait for the next block!

Friday, April 15, 2011

Ann's Autumn Country Rule 6

My road is the free motion cutting. I have been using this on my river in previous blocks, so am familiar with this.
My log cabin is paper pieced. It was fun, and I wish I had made it bigger, because the windows had 4 panes instead of one, but they were as big as the cabin, so I cut them down. The garden, cabin, shrubs and trees, and the sunflowers, wagon, and fence are all appliquéd on. I found some fabric that I was able to cut out and raw appliquéd, so it turned out fun. The smoke is embroidered, and I will probably re-do it. It is too stark.
The whole thing together. It is pretty fun to look at. Good luck to everyone else.
We are headed to the Seattle area for Grandkid activities this weekend. So had to get this posted before we leave.

Forest block #6

So, my teaser for those of you who didn't get it, was a calculus formula... it was using trapezoids to approximate the area under a sinusoid curve.  I have a couple trapezoids in my block, see?
I actually almost don't want to show the other side of the block, I really don't like how it turned out.  But I will show you anyway.


I think the bottom right corner needs something, but I'm not sure what.  Any ideas?  I'll probably hand applique something there, when I decide.  Well, here is the whole thing so far...


I really like how the freestyle turned out!  This was a fun rule, kudos to whoever put that rule in the hat!

Tuesday, April 12, 2011

Marie's Optical Illusion Rule 5

I'm finally finished with my block #5.  This was definitely a learning experience for me.  I had never machine pieced a circle before so it was fun to try and it and succeed.  The last time I needed a circle in a quilt I ended up appliqueing it because I couldn't get it to look right.  I won't be intimidated by circles any more.

I also haven't tried free motion embroidery before and it is fun, but I can see that I could use a whole lot of practice to get very good at it. 

I made two different blocks and put a circle and free motion embroidery in both of them.  In the bottom block the embroidery is the lines on the ball.  By the way, that's my version of the New Years Eve ball at Times Square.  The embroidery in the top block is the shadow of the ball.  I'm not sure if it looks like a shadow or a real amateur trying to do free motion embroidery.


These blocks took me a lot of time.  I think my creativity nearly exceeded my ability.    My inspiration came from "3 Dimensional Design" by Katie Pasquini.  The quilts pictured in her book are very large quilts and I'm trying to make very small blocks so it is rather difficult, but I'm pretty happy with the way they turned out. 

Here is my quilt so far. 


Now I guess I'd better get busy and see what I can do with Rule # 6.