CLICK HERE FOR FREE BLOGGER TEMPLATES, LINK BUTTONS AND MORE! »

Wednesday, February 1, 2012

Lyn's Winter Mystery - almost there

Lyn has had her block finished for several weeks but has had no way to get it posted.  Isn't it beautiful?
Below is the whole block.
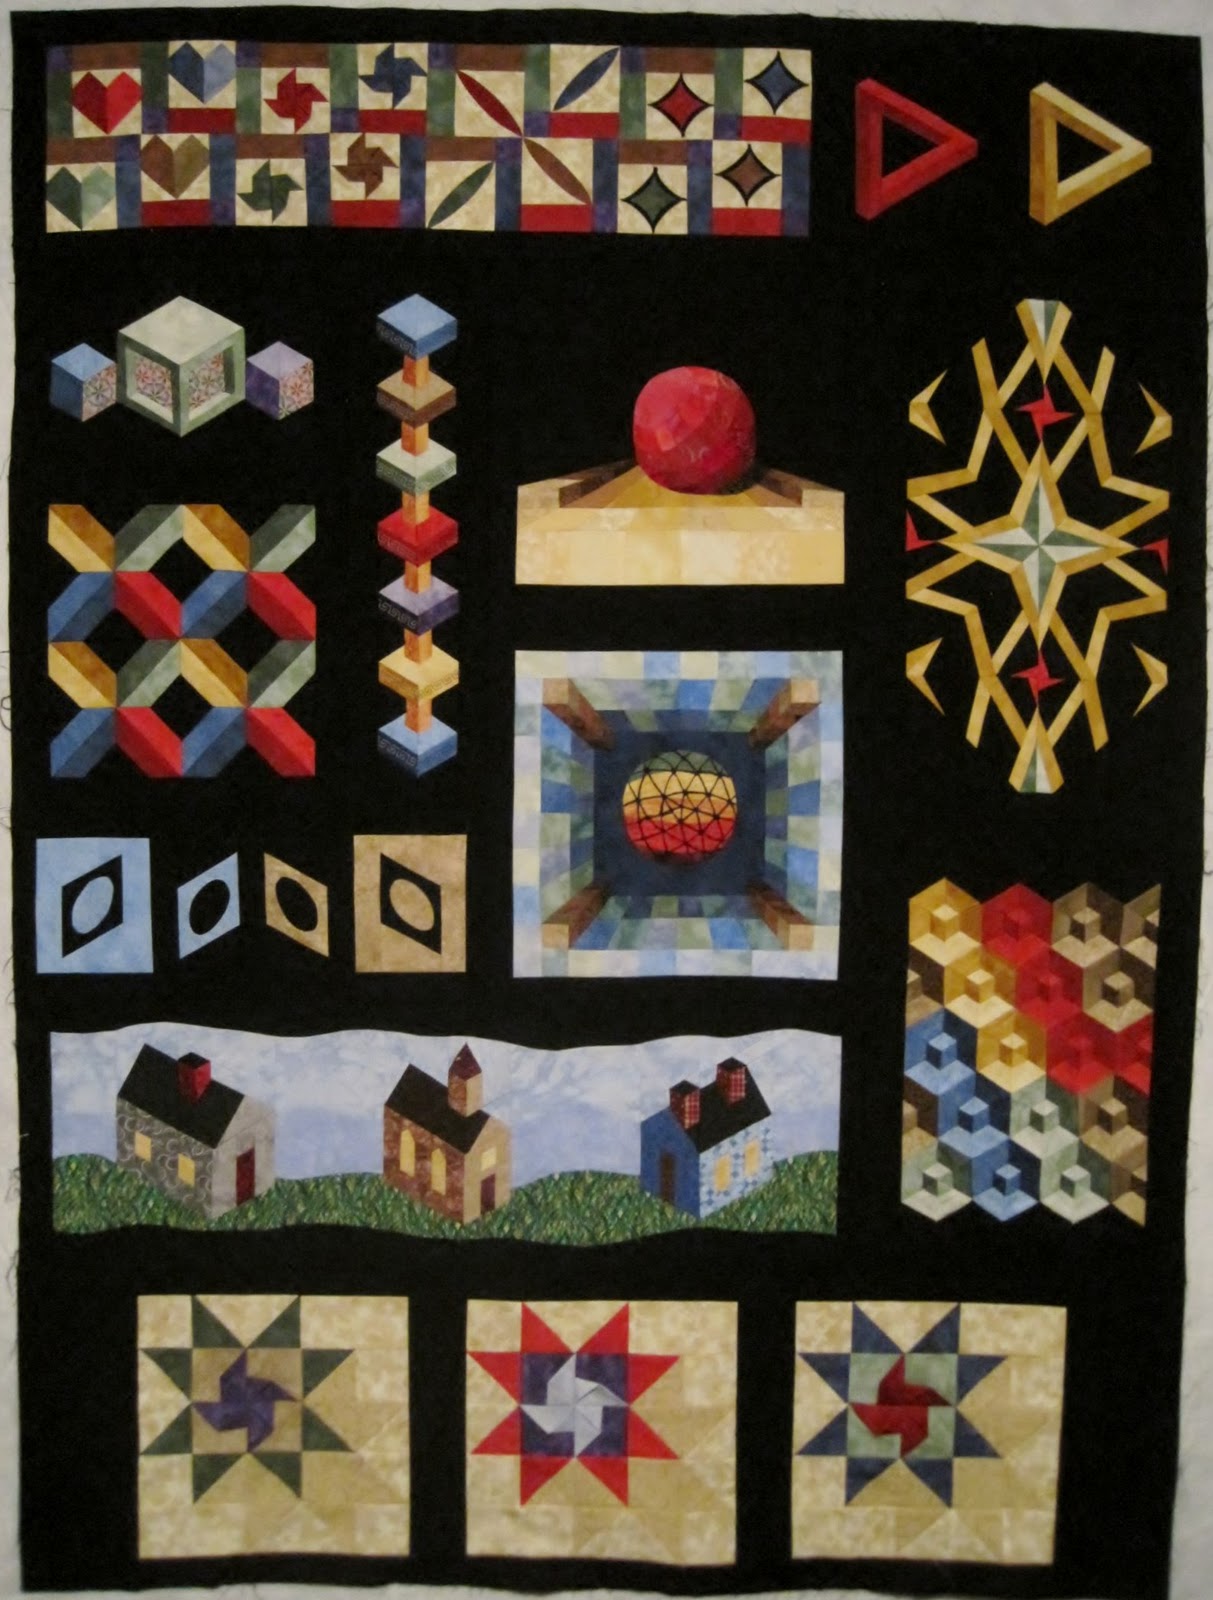
Here is where it goes with the entire quilt.

Saturday, January 28, 2012

Final Bird Block!!

Well, here is my last block, exciting but sad too.  I will miss these monthly blocks.  Hope we are soon working on another project!
This is the final block.  I see the chickadees are hard to see in the photo, but they show up better on the real block.  Everything is needle-turn appliqued and machine embroidered.
I couldn't get a good, full shot of the last two blocks joined.  They were just too wide to get the whole thing without making the photo too small to see the detail, so I have a shot from the middle.  The full quilt is below.


Sorry, a chair is in front of the bottom left corner, but it is just a continuation of the bottom center, so you aren't missing anything.  I have the fabric and a plan for the border and hope to get that done before long.  Will post it then.  It has been such fun working on this and getting acquainted with all of you guest quilters.  What a wonderful experience!

Tuesday, January 24, 2012

Block #15, and complete setting.

Final Block!!

This block took a lot longer to put together than it looks. The pine tree print had 4 inch wolfs with the snow around and between them. I cut small pieces of the snow print and set them around the trees. Much of this was needle turn applique using a blind stitch. I also had to overlay and applique trees over the the top of others to cover parts of the wolves and the holes cut to remove the wolves. I enlarged the mountain from the pattern I used in block 14.
Below is 14 and 15 put together. I found the cloud print looking for something else, and it seemed a better match than what I used earlier, so I took the old clouds off and added these. I do like them better.

And here is all 15 blocks put together. It makes quite a picture.
It measures about 60 X 80. I hope to get the borders on tomorrow.

Sunday, January 22, 2012

Pam's Wood Mystery rules 11,, 12 and 13

I am finally getting caught up. I only have two rules to go.
This is rule 11. I put two little heart shaped yoyo's at the bottom of two trees.
Rule 12 was the buggy barn technique and put words somewhere. I thought I would just put the name of my mystery in there.
Rule 13 was three tones of the same color. The only thing I could think of was to use the strip technique.
Rules 11 thru 13.
Rules 1 thru 13 - only 2 more to go!

Tuesday, January 17, 2012

Rule 14 & 15 - finished!

I ended up combining Rules 14 and 15 because of time constraints with student teaching starting soon (and the fact that I was behind on #14....lol). I haven't got a clue why the pic is sideways, but that's beside the point. The piano key border is one of my favorite things to use in bordering a quilt and there's no pink in the entire quilt. =) The hearts in the corners of the border are what remained of the teddy bear panel. I do admit to machine applique'ing them on because I didn't have time to do them otherwise. The only thing that didn't get in from Rule 14 was the pinwheel and that's because I could think of how to add one.

I'm not real happy with all the open background fabric in the bottom right, so I may end up adding something else there. But haven't decided on that.

I've had a great time working on the mystery this past year. It's been great fun to watch as everyone's quilt has unfolded. And if another one is done I'd love to take part again!

Saturday, January 14, 2012

Rule Release #15 - THE LAST ONE!

Rule Release #15

Hello again everyone! 

Wow!  We are actually releasing the last rule right behind our year mark.  I really did not expect to have a queen sized top this far done one year out.  This is wonderful!

Rule: "No Pink." 

The lady who submitted this rule always uses pink and wanted  to be forced against it.  Now, doesn't that sound like a simple rule to finish off with?  It is simple for me because I don't really like pink.

Technique:  Choose any technique you favor.   Perhaps there is one you tried this year that you wish to repeat.

Size:  We are going to complete the row we began in December.  This row completion, once sewn to the TOP or BOTTOM of your quilt, will complete the quilt top -- yay!  (minus borders).  Block #15 will need to be 30 1/2" wide ( 30" finished) by 22 1/2" tall (22 finished). 

Once this row is completed in February, the quilt should measure 60 x 80 which will fit the top of a queen-sized bed.  You will have to make borders to get the quilt long enough to go over the sides of the bed.

Due Date: I think the "quilt top" without borders should be due Feb 29, 2012 -- LEAP DAY.  I mean, we only have a due date such as this every four years, right.   It will also allow us catcher-uppers to catch up.

Thank you and enjoy.

Scarecrow, rule 13

I Used 3 shades of blue to frame a theme pieced of fabric.
Added  the crow fabric under it so the block would be the right size.  

Wednesday, January 4, 2012

Scarecrow rule 12

For the "buggy barn" technique I made the trees.  Those were fun.  So fun in fact that I decided to make a scarecrow Santa.  That may have been easier if I were making a BIGGER one.  But once I had a good start on this I continued even though the pieces were tiny to work with.   His face is pink and hard to see with the white bg.  I am going to put more details on the face and a pompom or button on the tip of his cap.
For the "words" part of the clue, as you can see,  I used fabrics with words.  The crow fabric has a sign that says, "When this you see, remember me" .  I have been putting words here and there throughout the quilt already.   So I thought fabrics with words would be fine here.  
I really do love this project and I am sorry to have fallen behind.  I hope to get up to date here pretty soon.

Monday, January 2, 2012

9 and 10 done - The Quilted Barn

I am finding some time to catch up -- yippee!  I am only three behind now.

The first row was added to the bottom of the quilt.  Different sized blocks that fit together are in the barn section while the orange flowers are 3D.

The very bottom row has the folded insert technique.  I did it very simple by folding the green strip of fabric on the bottom right and catching the edges in the seam.  I appliqued the fold down.  The disappearing 9 patch is in the front of the lower red barn.  I sewed the disappearing pieces together at random with no specific rhyme or reason.

Now I am off to making a bridge and horse/buggy to begin my column.

Oh, I finally got all of my itty bitty flowers attached to the fence between the two big trees.  They are a bit busy, but I like it.

I also added three small trees below the "falling apart" old barn on the left.
Below is a close up of the two newest rows.

Below are closeups of the flowers.  The whole flower section was made by putting fusible webbing on the back side of the fabric, fusing it to itself, and then cutting out the flowers.  The front and back of the flowers are the same fabric.  Most were attached with a French knot, but some I used invisible thread.

Sunday, January 1, 2012

Lyn's Small Town Winter is current to Rule 14.

Here is Lyn's Rule #14.  She is busily working on rule 15 and will have it done on time on January 15th as scheduled.


Thursday, December 29, 2011

Additon to Bird Rule 14

I decided I liked Moira's suggestion of adding more branches, so here is the updated block.

I like it better.

Monday, December 26, 2011

Granny Annie's Garden Rule 13


As you know I'm not doing the quilt but still following the rules. I've made quite a few wall quilts so decided to do a tablerunner this time. The binding is my third green tone.


Autumn Courntry Rule 14 Release

Since this is the top, what better thing to add than the sky and the sun. Mountains in the background and of course, pine trees.

For the rule and technique, the sun is my pinwheel and it is needle turn appliqued behind the sky. I cut the circle and appliqued it by hand. From each seam of the pinwheel, I hand embroidered a sun ray. The mountains were fun to do. I have a pattern with one mountain with the snowcap, but it looked pretty lonely, so I added a couple more. For a block this size, it was a challenge to fill it in, and I may still add some more clouds.

Friday, December 16, 2011

Bird Mystery Rule 14 Reveal

Here is my Rule 14.  I'm not sure I like it, but I need to let it sit for a while before I decide for sure.  I may add something, perhaps a swallow with a third pinwheel in it's beak.  I'm a little uncomfortable with all the open space, but I may decide I want to keep it and quilt a design in it.  Any suggestions?

Friday, December 9, 2011

Rule Release #14

Rule Release #14


Hello again everyone!  How is your Christmas readiness coming along?  I am certain we all have our days and evenings filled with all sorts of goings-on.


As for the Dorinda Mystery, we are very close. The last rule release will come out in January and then we will have a top completed minus borders -- yeah!!

Rule:  Make a pinwheel


Technique:  combine a hand stitched applique with embroidery

Size:  We are going to make half of a row this month and next month we'll make the other half to complete the quilt top (minus borders).  This row will go on either the TOP or BOTTOM of the quilt.  Block #14 will need to be 30 1/2" wide ( 30" finished) by 22 1/2" tall (22 finished). 

Once the row is completed in early February, the quilt should measure 60 x 80 which will fit the top of a queen-sized bed.  You will have to make borders to get the quilt long enough to go over the sides of the bed.
Due Dates: The next and FINAL rule will release January 15th.  You can begin showing a full release of #14 any time it is completed. 

Tuesday, December 6, 2011

Granny Annie's Garden, Rule 12


Well here I am with Rule 12. It's another wall quilt. I searched out a real Buggy Barn pattern of butterflies. I wanted the top & bottom background to be the same color in all 3 blocks, though, so I altered it a bit. I love how it turned out.

Thursday, November 24, 2011

Wonderful Work!

I've just spent part of my Thanksgiving Day enjoying all the beautiful pictures you've been posting. You've made such wonderful quilts! I look forward to seeing how things finish. I've enjoyed learning to know some of Dorinda's descendants a little, too. What a terrific heritage!

I guess this will be my 2012 mystery, too! When I got involved in buying the house, I spent several months not stitching, and now I can't catch up with it all. I will work on that through 2012, though, and if the blog stays up, you will see the way I finish my Civil War version. I expect I'll leave out a few techniques that don't fit the era, but there will be a finish. I've really enjoyed this year's project, even though it's so completely not done.

Is there a plan for a 2012 project of some kind? I would love recreating an antique quilt with others of like mind.

Saturday, November 19, 2011

Moira's Rule 13 Reveal

Yippee, I'm actually up-to-date with this one and that makes me happy, not to mention actually being able to quilt for a change, something that is rare at this point in grad school.

Since I'm working on my second quilt for this mystery I get to be creative with my measurements. So instead of adding another section to the quilt for this rule, I added to the previous section where I had put the words in order to use some of all the blank space that i had with the section.

I appliqued 22 balloons around the words. I used scraps for all of teh ballons (thereby "using it up" ;-) ) in yellows, oranges and reds. There are three different shades of each color.

Monday, November 14, 2011

Bird Rule 13 Reveal

I really enjoyed this one.  I chose to use a stack and whack to create a peacock tail.  The body of the peacock, the blues in the tail, and  the sky in the background are my three values of the same color.

I put this block on the top of my column, and here is how that turned out.

When I went to put this column on the side of the quilt, it didn't fit.  It was two inches short.  I have no idea where I messed up, but I had to make it work, so I sewed another strip of the stripe across the top.  I would have done more of the sky, but I didn't have enough fabric to get a full strip across the top without a seam in it, and I thought that would look worse than using the stripe, so here is the whole quilt as adjusted.

Sunday, November 13, 2011

Autumn Country Rule 13 Reveal

This was a fun rule, and since I was working with a whole panel, finishing off the bottom with the D9P was just the natural thing to do. The fabric I got for the trees was different shades of the yellow/gold so that fit the rule perfectly. I was up all night Tuesday night, with something else, so spent the time at the sewing machine and nearly finished the block during the night. I had to find a button similar to those I used on the previous yo-yo trees, so I could not complete it until I got the button.
I did take a picture of just rule 13, but for some reason I can't get the computer to add another picture, so you will just have to look at the entire panel.

Here is the entire top to this point. The yellow background really stands out in this picture. Those of you who have seen the fabric know how gorgeous it is.
The next panel will have to go on the top, so I hope the rule is something I can add to my "picture". Otherwise, it will be hard to finish off.

I have Autumn Leaves fabric for my outer panels, so that will tie everything together. I am excited that we are this close to being finished! It has been a really fun project.

Saturday, November 12, 2011

Marie's Optical Illusion Rule #11

Yippee, I finally finished Rule 11, and have hopes of catching up soon.  This rule required at least one yo-yo. This was another new technique for me--I've never made a yo-yo before. I was only going to make one and put it in the center block, but it was so much fun I decided that each block needed a yo-yo. I think I finally got the right color combination for the shadows this time, but I'm not going to change the star blocks.


Tuesday, November 8, 2011

Rule Release #13

Rule Release #13

Rule:  Must use 3 tones or values of the same color.


Technique:  None - use any technique you choose.

Size:  We are going to complete the column we started in rules 11 and 12.  Remember that this column will go on either side of the quilt.  Block #13 will need to be 17 1/2" wide ( 17" finished) by 19 1/2" tall (19 finished).  You can join block #13 to the top or bottom of your 11/12 column. 

Due Dates: The next rule will release December 8th.  You can begin showing a full release of #13 any time it is completed. 

We are getting very close.  The quilt should now fit on the top of a queen-sized bed.  We'll need to add borders to hang over the sides.

Saturday, November 5, 2011

Marie's Optical Illusion Rule #10

I'm so happy to finish another rule.  Now I'm only 2 months behind!  Rule #10 is 4 disappearing 9 patches.  The technique was to use a folded insert.  I've never made d9p before, and they were really fun.   I combined the folded insert with the d9p's. 

I really had fun making this (faux) cathedral windows block.


 I don't know what to call this block.  It's rather different, but it is a d9p and it has fabric folds.

I used folded pinwheels in my last rule, and decided to put some in this one too.


Here are my 4 d9p pieced together.  The hearts aren't folded, but they fit my optical illusion theme.


I added the 3-d continuous triangles because I thought I needed  more optical illusions.


Here is the whole quilt, just waiting for me to finish the next rules.

Tuesday, November 1, 2011

Marie's Optical Illusion Rule #9

I finally have finished Rule 9.  I'm still way behind, but at least I'm making some progress.  This rule called for different sized blocks that fit together.  I used this rule to make my star.  The technique was something 3D that actually sticks up on the quilt.  My pinwheels in the center of the stars are 3D.  To make the rule fit my theme of optical illusions, I added a shadow to the star.  I wish I would have made the shadow a little darker, but I'm not going to do it over!


Here is the quilt with the Rule 9 blocks added.


I hope to get Rule 10 completed before Rule 13 comes out in a week, and then hopefully I'll get the rest caught up before the end of the year. 

Lyn's Small Town Winter Caught Up

Here is what she did:
She made half yo-yo's on the silos. She paper peiced the yellow house. To follow the Buggy Bard pattern, she created a tractor. She also wrote 2011 on the silo by embroiding.