CLICK HERE FOR FREE BLOGGER TEMPLATES, LINK BUTTONS AND MORE! »
Showing posts with label Deana's Quilted Barns. Show all posts

Monday, January 2, 2012

9 and 10 done - The Quilted Barn

I am finding some time to catch up -- yippee!  I am only three behind now.

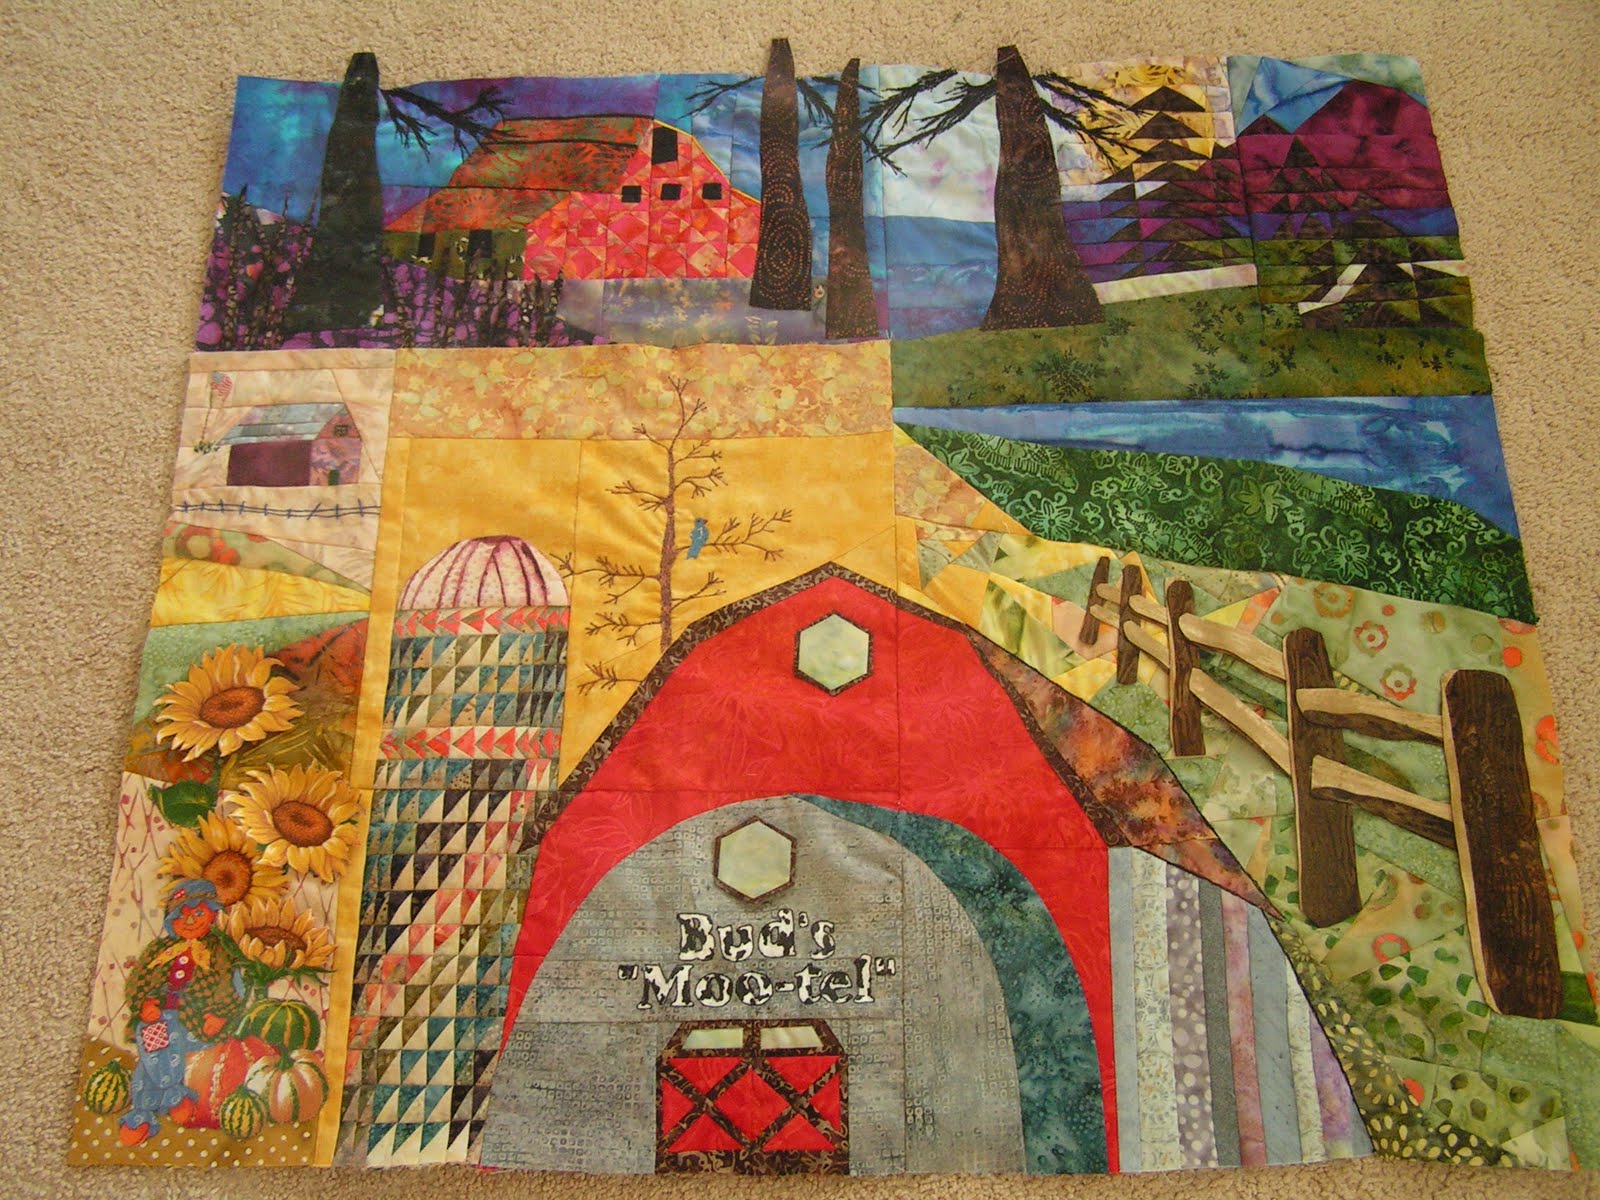
The first row was added to the bottom of the quilt.  Different sized blocks that fit together are in the barn section while the orange flowers are 3D.

The very bottom row has the folded insert technique.  I did it very simple by folding the green strip of fabric on the bottom right and catching the edges in the seam.  I appliqued the fold down.  The disappearing 9 patch is in the front of the lower red barn.  I sewed the disappearing pieces together at random with no specific rhyme or reason.

Now I am off to making a bridge and horse/buggy to begin my column.

Oh, I finally got all of my itty bitty flowers attached to the fence between the two big trees.  They are a bit busy, but I like it.

I also added three small trees below the "falling apart" old barn on the left.
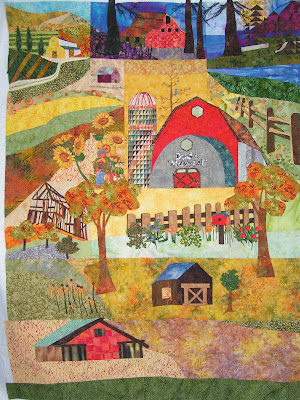
Below is a close up of the two newest rows.

Below are closeups of the flowers.  The whole flower section was made by putting fusible webbing on the back side of the fabric, fusing it to itself, and then cutting out the flowers.  The front and back of the flowers are the same fabric.  Most were attached with a French knot, but some I used invisible thread.

Friday, September 2, 2011

Deana's Barn Rule 8

Here is a close up of rule #8 attached to rule #7.  It is hard to see where I seemed them together. 
I paper pieced the warn out, thread bear barn for the paper piecing technique.  I added yellow and a flower -- the yellow field and another sunflower.
Here is a photo of everything that is finished up to this point.  This is the first I've shown the fence, birdhouse, and trees completed in rule 6.  As a reminder, rule 6 asked for free hand curved piecing and a house.  I built a birdhouse and curved pieced the ground.

Below is what I hope the fence/birdhouse section will look like when it is finished.  I want to add all the flowers in a way similar to the photo below.

Thursday, August 4, 2011

Deana's Barn #8 tease

Yep, I am behind but working hard to catch up.  Here is a teaser sketch of my next barn:

Saturday, July 30, 2011

TOO FUNNY...

Just brought home my husband from several days in the hospital only to discover that I'm not the only one not ready for the next rule.  We'll all play catch up togeher.

GOOD LUCK!

Wednesday, June 1, 2011

Barn #7 complete

I finished my #7 barn block.  The barn is the 3D section.  I thread painted around the trees to make them look bushy.  I tried to create a feeling of depth with the trees.  It is supposed to look like a field in the distance.  There are also farming row on the hill by the road.

Below you can see the new piece with the main quilt.  Rule #6 at the bottom is still a work in progress.


Wednesday, May 25, 2011

Barn #7 teaser

It just needs some applique and some trimming.  I know it looks pretty much like a mess right now though.

Saturday, May 21, 2011

Barn teasers #6 & #7

My #6 is pretty behind but slowly catching up.  It is a ton of work and I'm loving it.  Here is a sneak preview of it all layed out but nothing is stitched down.
Below is my teaser for rule #7.  You can see where it fits next to on the original quilt.

Tuesday, April 26, 2011

Barns: teaser #6

While I was behind on rule 5 (by a long way) I do know what I'm doing for rule 6.  The design process is what takes me so long, so hopefully this one will be ready on time.

I think it is obvious what I'm creating here.

Barns Rule 5


Here is proof that I pieced the circle.  The top part of my moon was pieced this way while the rest was part of the paper piecing.
Here is the whole section.  My circle doesn't look perfectly circular because I placed the silhouette of a tree off center in it.  I do like it though.  I added thread painting in two places including the tree branches (also added to rule 4), and some outlining on the barn.  Originally I had a yellow background behind the barn which I loved, but I felt it needed a little more of something so I changed to a grassy green pasture look.  There are a couple of trees pieced in front of the mountains (they blend in a little) and an unexpected little river runs below them.  It is actually sky fabric but turned out more rivery.  I think I like it.

Here are some close-ups of the thread painted branches.  I'm no perfectly satisfied with them and may still work on them some.


This tree maybe needs a few more branches.  I also added one more badly needed black line on the barn roof.  It looks better now.

Tuesday, April 5, 2011

Still a Mystery: Barns

I wanted to show my progress and explain why it isn't done.  I've finished building "Bud's Moo-tel", but have way too many ideas for the upper half of the new section.  Some barn details and some foilage/trees will be thread-painted in once the section is complete.  The circle is the part that I have too many ideas for.  I originally planned to have a setting (or rising) sun over the trees on the top right.  My new idea is to have a day sun over some mountains brightening some fields in the distance behind the red barn.  I have even contemplated doing a large circular section with an entirely new scene in it.
Sorry I'm so indecisive, but the mystery, even for me, is still the best part of the journey.
 

Sunday, March 20, 2011

Barn teaser #5

Not a single stitch yet, but a paper-pieced pattern is sketched.  I have also laid out some of the fabrics I have selected.  Oops, cut some off the top.  If you look closely, you'll see words that are written in mirror image.  I will copy this pattern onto overhead sheets and then flip the sheets over to make a reverse copy for the paper pieced pattern. 
I have decided what to do with the circle, but haven't sketched it yet.  I still have several inches to the right that need to be designed on this one.  No idea yet on the free motion embroidery part.

Saturday, March 19, 2011

Deana's #4 Barn COMPLETE

I finally "got 'er done".  The front of the barn uses a square-in-a-square pattern of positive negative.  It is subtle, but it is there.  I think it gives the effect of shadows and worn paint.  The trees were hand appliqued using the freezer paper on bottom method.  I also appliqued the third window in the row because I forgot to use black in the center of my square-in-a-square block there to form the window.  I may add some shadowy branches later.  I'll cut the tops off once I do the next block that goes on top.
The next pictures gives you a closer view of the underbrush.  You can see that it is just basted down.  I caught the edges in the seam when I attached it to the main barn block.  I used steam-a-seam on two pieces of the same fabric, peeled off the paper, and then stuck them to each other (wrong sides together).  They will be permanently stitched down in the quilting phase.  I think they show depth and the purple Batik behind them looks like shadows of them dancing in the moonlight.

My favorite part of this block is the night sky.  It is made from a piece I hand-dyed with Dharma proactive dyes a few years back.

Friday, March 18, 2011

Deana's Rule #4 Barn progress

I know I am very late and should be posting a #5 teaser, but I wanted to show that I haven't desserted you.  Hopefully you can see a barn in progress here.
I'm going with a night sky on this one.  I hope I can blend it in.

Friday, March 4, 2011

Barn teaser

I apologize for the late teaser, but life is pretty busy and my creative juices have been slow flowing.
I've been brainstorming on this rule quite a bit, but today is the first I've been able to sketch any form of my idea.  I promise that the black and white version gives little light as to what is being created in my head.

Thursday, February 17, 2011

Deana's Rule #3

I began by piecing a background to applique on.  I placed two fabrics on top of each other, right side up, and cut a free handed curve with the rotary cutter.

Next, I removed the excess layers and seamed the curve together.

This is what I ended up with.  I tried to follow similar lines on the paper next to it.

Next I pieced the little barn's roof in strips that were cut different widths then seamed back together with offset rows.   I was trying to go for a patchy "tin" roof look. 

The roof is small and kind of hard to see the pieced sections in it.  At this point I used the embroidery technique by doing hand work for the fence, window, door, grass, and flag pole.  The flag is cut from a piece of fabric "that I wouldn't normally use" as described in the rule.  I tried to match the background of the flag the best I could so I was able to piece it in (too small to do much else).
Below is a selection of fabrics I found in my stash to help me fulfill the #3 rule.  They are all novelty prints I wouldn't normally use.   Below I have tropical birds, Star Spangled Banner music, pink (I don't like pink), frogs, and the very ugly fruit & vegetable print.  Next to that is a netting type fabric (I pondered making a chain link fence out of it), and then a silky grey.  Hmmm.  I really had to study these ideas for a couple of days.  You can see where I got the tiny flag from.


I really liked it at this point but wanted to show more depth so I put fusible webbing on the back of this VERY UGLY piece of fabric and cut out some useful pieces.

I arranged the melons, scarecrow, and sunflowers as desired.  All but the sunflowers were machine blanket stitched on with invisible thread to fused applique pieces.  Normally I like to cover the raw edges, but I didn't want an applique look.  I was going for more of a realistic look. 
The sunflowers are 3-D.  You can actually stick your fingers under them.  They are stitched on only at the centers.  This works because I fused another fabric to the back of them, making it stiffer and pretty much finished. 

My intent with the large sunflowers was to create a sense of depth pushing the fields and little barn into the background.

I realize that the sunflowers are not proportionate in size to the silo, but I'm not going for that realistic of a look in this quilt.

I am so very pleased!!

Thursday, February 3, 2011

The Quilted Barn Rule #2 (finally)

FINALLY the silo is pieced.  Wheeww -- a load off my shoulders.  It is embarrassing to be one of the main hostesses and be late.

I REALLY wanted to hand piece the entire grey area with hexagons to meet the rule, but the silo just took too long and so I settled for a window.  Most of the block is paper-pieced with some hand applique on the curve and upper window. 
The words are kind of fun for me.  Grandpa Bud was a dairy farmer, and while this doesn't look anything like his milk barn, it stands as a memoir to him.  I played with several fonts on the computer until I found one I liked.  Next, I accidentally discovered that I could fill the words in with holstein cow hide.  That really sold me.  I then pondered for days how to get the words on my barn.  I finally resorted to fabric paint.  It was rather time consuming, but worth it.  I then outlined each letter in black thread with sort of a free-motion threadwork technique just like I did with the tree in my former block.

Here are both blocks together at last.  The silo is a little tall but ok.  I have no idea what inspired me to make a strip of red going down the silo.  I think it would have been better without, but too late now.   I will still try to put leaves on my tree.

I just wanted to add that the rules are making this so much fun.  There is no way I would have thought to put flying geese in the silo without the rule, and my windows were going to be rectangular in the original drawing.

Now I'm off to decide whether to finish building the right side of the barn or start something new on the left...hmmm.  Let me just admit that I change my mind EVERY DAY I work on this project.

Friday, January 28, 2011

Block #1 done: Deana's Quilted Barn

Can you see my flying geese?  There are 22.

 
I finally finished my first block.  The silo is paper-pieced.  It has 154 pieces in it so far and will have more when I complete it in another section to be added to the bottom.  I painted the top of the silo with fabric paints and did threadwork for the tree and bird.  I will maybe add some leaves later because I want an early autumn look.  The barn is paper pieced also.  I added the hexagon shaped window after rule #2 came out so this window would match the second block.

SO MUCH FUN!!!


Teaser Time: Deana

I REALLY wanted to post Block #1 today except I need to add a 2 3/4" section across the top.  Here is a sneak peak.  Also, I had an epiphany this morning and there is something else that MUST be added to this block before I can say it is complete for show.
Ok, my rule #2 block involves a cow.  It is partially pieced and will involve some handwork which is good because I will be spending today and tomorrow at a wrestling tournament.  (I LOVE WRESTLING and QUILTING so why not do them together?
It also involves a hand-made paper pieced pattern and many tiny little pieces.  One section is done.

Saturday, January 1, 2011

Hello from Deana

Hello everyone!  Although everyone knows me but Ann Marie, I'll introduce myself anyway.  I am a mother to teenagers and very happily married.  I LOVE to quilt and have been doing so for over 18 years.  I also teach adults -- help them get their high school diploma OR GED.

Below are my starter fabrics for this mystery.  I intend to use mostly Batiks (since I LOVE them).  My theme is "The Quilted Barn".  I plan to make a variety of barns or houses, fences, fields, flowers -- whatever tickles my fancy that month.  I may incorporate quilt patterns into my barns (somehow).
P.S. I am so very excited about this project and truly hope others will not be afraid to join us.  If anyone out there is intimidated, DON'T BE.  We'll HELP you.